2007. 8. 2. 17:27
336x280(권장), 300x250(권장), 250x250, 200x200 크기의 광고 코드만 넣을 수 있습니다.
보통 이미지처리는 WEB서버에서 하지만
WAS에서도 이미지처리(jpg 등) 및 서블릿 등을 처리하도록 할 수 있다.

해당옵션에서 true 로 설정하면 이미지 처리도 WAS에서 담당하는것이고
false 로 설정하면 서블릿이나 jsp 등만 WAS에서 처리하도록 합니다.

/app/mjstory/webapp/mjstory.ear/MJSTORYWeb.war/WEB-INF
경로에 존재하는
ibm-web-ext.xmi
파일을 수정하면 되고

fileServingEnabled="false"
을 true / false 로 설정하면 된다.

'WAS' 카테고리의 다른 글

apache 로그 날짜별로 저장  (2) 2007.10.15
http 오류코드  (0) 2007.08.01
WebSphere 버전별 WAS stop/start  (0) 2007.03.26
Posted by 백냥
2007. 8. 1. 14:29
336x280(권장), 300x250(권장), 250x250, 200x200 크기의 광고 코드만 넣을 수 있습니다.

아래 굵은색 표시는 일반적으로 많이 나타나는 오류코드입니다.

HTTP 1.1 status codes [TOP]
 
100 : Continue
101 : Switching protocols
200 : OK, 에러없이 전송 성공
201 : Created, POST 명령 실행 및 성공
202 : Accepted, 서버가 클라이언트 명령을 받음
203 : Non-authoritative information, 서버가 클라이언트 요구 중 일부만 전송
204 : No content, 클라언트 요구을 처리했으나 전송할 데이터가 없음
205 : Reset content
206 : Partial content
300 : Multiple choices, 최근에 옮겨진 데이터를 요청
301 : Moved permanently, 요구한 데이터를 변경된 임시 URL에서 찾았음
302 : Moved temporarily, 요구한 데이터가 변경된 URL에 있음을 명시
303 : See other, 요구한 데이터를 변경하지 않았기 때문에 문제가 있음
304 : Not Modified status codes.
       클라이언트가 요청된 문서를 서버에서 검색하지 않고 로컬 사본을 사용한 요청의 회수
305 : Use proxy
400 : Bad request, 클라이언트의 잘못된 요청으로 처리할 수 없음
401 : Unauthorized, 클라이언트의 인증 실패
402 : Payment required, 예약됨
403 : Forbidden, 접근이 거부된 문서를 요청함
404 : Not found, 문서를 찾을 수 없음, 일반적인 인터넷 안될 때 나오는 오류
405 : Method not allowed, 리소스를 허용안함
406 : Not acceptable, 허용할 수 없음
407 : Proxy authentication required, 프록시 인증 필요
408 : Request timeout, 요청시간이 지남
409 : Conflict
410 : Gone, 영구적으로 사용할 수 없음
411 : Length required
412 : Precondition failed, 전체조건 실패
413 : Request entity too large,
414 : Request-URI too long, URL이 너무 김
415 : Unsupported media type
500 : Internal server error, 내부서버 오류(잘못된 스크립트 실행시) 또는 WAS 등(예;톰캣,웹스피어 등)의 미들웨어가 동작하지 않을 때
501 : Not implemented, 클라이언트에서 서버가 수행할 수 없는 행동을 요구함
502 : Bad gateway, 서버의 과부하 상태
503 : Service unavailable, 서비스가 죽었거나 현재 멈춤 상태
504 : Gateway timeout

'WAS' 카테고리의 다른 글

apache 로그 날짜별로 저장  (2) 2007.10.15
WAS에서 이미지처리 하도록 설정  (0) 2007.08.02
WebSphere 버전별 WAS stop/start  (0) 2007.03.26
Posted by 백냥
2007. 7. 30. 20:54
336x280(권장), 300x250(권장), 250x250, 200x200 크기의 광고 코드만 넣을 수 있습니다.


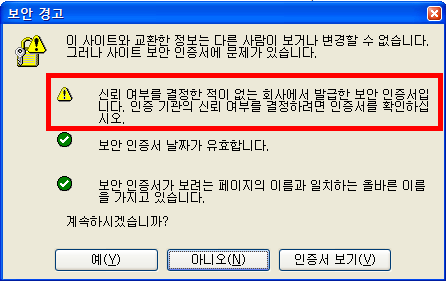
일반적으로 웹보안인증서(SSL)을 구매하여 적용하면 아래와 같은 오류메시지는 나타나지 않는다.  또한 아래 이미지와 같이 3개의 항목을 충족하여야만 오류메시지가 나타나지 않는다.
그 3개의 항목은 다음과 같다.
사용자 삽입 이미지

경고메시지


(1) 신뢰된루트인증서
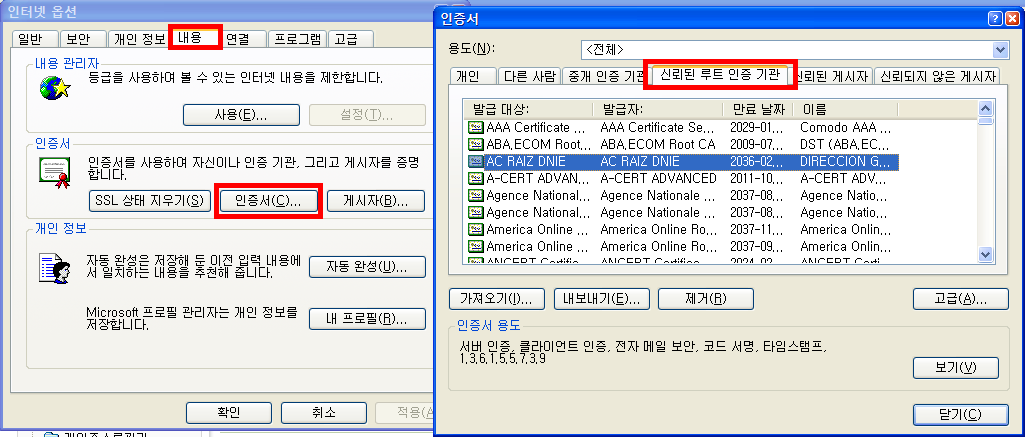
    신뢰된 루트인증서가 MS윈도우 웹브라우저에 탑재되어 있어야 한다.
사용자 삽입 이미지

MS인증서저장소


(2) 보안인증서 날짜
    인증서가 발급되고 그 인증서에 대한 유효기간이 유효해야 한다.
    유효기간이 일치하지 않으면, 역시 경고메시지가 나타난다.

(3) 사이트이름과 일치
    웹보안인증서(SSL)가 발급될때 발급대상에 적힌 인증서와 웹사이트주소와 일치해야 한다.

상기 항목이 일치하지 않으면 경고메시지는 나타나게 되어있다.

일반적으로 웹사이트에 제공하는 보안접속...이란 곳을 체크하면 3가지 항목이 충족하기때문에 경고메시지가 나타나지 않는다.  하지만 간혹 3가지 항목을 만족하지 못해서 경고메시지를 나타내는 사이트들이 더러있다.

Posted by 백냥
2007. 7. 26. 17:13
336x280(권장), 300x250(권장), 250x250, 200x200 크기의 광고 코드만 넣을 수 있습니다.
어느분이 시스템트레이에 이상한 메시지와 virusprotectpro.com 접속되는 화면이 나타난다며 문의를 주셨고 관련 내용을 확인하여 보니 불편할것 같아 아래와 같이 확인한 후 조치하였다.

접속URL
사용자 삽입 이미지

virusprotectpro.com 접속화면


또한 시스템트레이에 주기적으로 아래와 같은 메시지가 돌출되었다.
사용자 삽입 이미지

지속적인 메시지발생


레지스터리를 확인하니 아래와 같은 것이 눈에 보였다.

사용자 삽입 이미지

.


그래서 도스창에서 c:\windows\system32 에서 해당파일을 삭제했다.
사용자 삽입 이미지

system파일


c:\windows\system32\zpuwriz.dll 파일 지우고 재부팅했더니 정상적으로 표시되었다.
이로서 또 한건 했다.
Posted by 백냥
2007. 7. 10. 15:24
336x280(권장), 300x250(권장), 250x250, 200x200 크기의 광고 코드만 넣을 수 있습니다.


메일을 보냈더니 아래와 같은 메시지가 리턴되어 문의가 들어왔다.

550 [Sniper] <
xxx@xxx.xx.kr> isn't allowed to relay.

메시지내용으로 봐서는 xxx@xxx.xx.kr 메일에 대해 릴레이를 허용하지 않는다 라는 의미로 받아들여진다.

확인결과 다음과 같은 내용으로 인해 정상적으로 되지 않는 상황이었다.

우선 아웃룩 익스프레스로 리턴되어 돌아온 내용을 확인하였다.
Your message
  Subject: 메일보내기
was not delivered to:
  xxx@xxx.xx.kr
because:
  550 [Sniper] <xxx@xxx.xx.kr> isn't allowed to relay.
리턴된 파일은 다음과 같았다.
- 메일보내기.eml
- ATT00057.dat
파일 중 ATT00057.dat 파일을 열어보면
Reporting-MTA: dns;xxx.xxxx.co.kr

Final-Recipient: rfc822;xxx@xxxx.xx.kr
Action: failed
Status: 5.0.0
Remote-MTA: smtp;mail.abcd.co.KR
Diagnostic-Code: X-Notes; 550 [Sniper] <xxx@xxx.xx.kr> isn't allowed t
 o relay.

Reporting-MTA 는 자신이 사용하는 메일서버이고
Remote-MTA 는 상대방에서 리턴한 메일서버이다.

Remote-MTA를 확인해보면 릴레이 허용되는지를 확인해보아야 한다.

또한 해당 도메인에 대해 MX 레코드값을 확인해보니 다음과 같았다.
내부DNS와 코넷DNS MX 레코드값이 틀렸다.
c:\>nslookup
Server: xxxx.xxxx.xxxx
Address: xxxx.xxxx.xxxx.xxx

>set type=mx
>abcd.co.kr

abcd.co.kr   MX preference = 10, mail exchanger = xxx.xxx.xxx
메일서버가 중간에 바뀐모양이었다.

이야기 인즉, 기존에는 관문메일서버가 메일을 받아 하위단 메일서버로 릴레이를 허용했었는데, 변경되면서 관문메일서버가 받지 않고 자체메일서버가 받는 상황인듯 보였다.

또한 내부DNS에 관문메일서버에 대해 dns db 파일을 별도 가지고 있어 코넷DNS쪽에 반영되었지만 내부DNS에는 반영되지 못한 상황이었다.
Posted by 백냥
2007. 5. 16. 08:53
336x280(권장), 300x250(권장), 250x250, 200x200 크기의 광고 코드만 넣을 수 있습니다.
아웃룩 익스프레스 저장위치 변경 방법입니다.

아웃룩익스프레스 5/6 실행합니다.

(1) 도구-옵션-유지 관리 탭을 선택
(2) 폴더 저장 단추를 누르면 현재 설정 위치가 나타남
(3) 변경 단추를 누른 후에 원하는 위치를 지정
(4) 아웃룩 익스프레스를 종료 후 다시 시작


참고URL: http://support.microsoft.com/kb/601103/ko


한글 OE5:편지함 저장 위치 변경 방법

기술 자료 ID : 601103
마지막 검토 : 1999년 6월 8일 화요일
수정 : 1.0
이 문서는 이전에 다음 ID로 출판되었음: KR601103

요약

이 문서는 아웃룩 익스프레스 5에서 편지함의 저장 위치를 변경하는 방법을 설명한다.

추가 정보

아웃룩 익스프레스 5를 실행한 후에 아래를 진행한다.
1. 도구-옵션-유지 관리 탭을 선택한다.
2. 폴더 저장 단추를 누른다. 현재 설정된 위치가 나타난다.
3. 변경 단추를 누른 후에 원하는 위치를 지정한다.
4. 아웃룩 익스프레스를 종료한 후 다시 시작합니다.

본 문서의 정보는 다음의 제품에 적용됩니다.
Microsoft Internet Explorer 5.0

위로 가기

키워드:
KB601103
Posted by 백냥
2007. 5. 4. 13:21
336x280(권장), 300x250(권장), 250x250, 200x200 크기의 광고 코드만 넣을 수 있습니다.

일반적으로  Windows Update 를 이용하면 Windows에 대한 fix 만 제공한다.
하지만 Microsoft Update 를 이용하면 Windows 뿐만 아니라 Office 에 대한 fix 정보도 제공해준다.

Microsoft Update 로 변경한 후 Windows Update 로 돌아가려고 했더니 어디서 설정하는지 찾을 수 없었다.  우연찮게 서핑하니 관련글이 발견되었고, 그 방법에 따라 설정을 하였다.

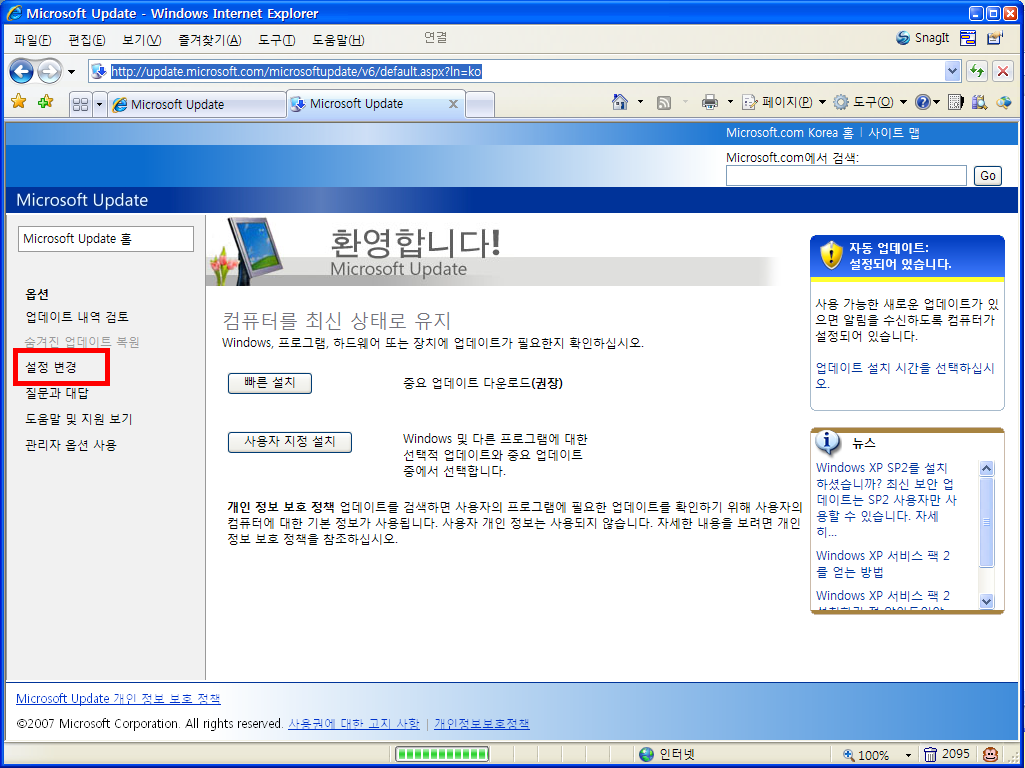
(1) 브라우저를 이용하여 Windows Update 사이트로 접속을 시도한다.
(2) 환영합니다란 메시지가 나타나고 왼쪽메뉴 중 "설정 변경" 메뉴를 선택한다.
사용자 삽입 이미지

(3) 화면 아래에 위치한  Microsoft Update 중지 하기 버튼을 선택한다.
사용자 삽입 이미지

(4) 성공적으로 완료되었다.
사용자 삽입 이미지

위의 방법을 찾기 위해 많은 노력(?)을 기울였다. 근데 이렇게 쉬울줄이야.
참고한 사이트는 다음과 같다.


INTRODUCTION

The Windows Update Web site provides security updates for Microsoft Windows operating systems. The Microsoft Update Web site provides these updates in addition to updates for other Microsoft programs, such as Microsoft Office. By default, your Microsoft Windows 2000-based, Microsoft Windows Server 2003-based or Microsoft Windows XP-based computer will access the Windows Update Web site. If you would like to receive updates for other Microsoft programs please perform the steps that are listed below.

Back to the top

MORE INFORMATION

I am currently using Windows Update. How can I access Microsoft Update?

To use Microsoft Update instead of Windows Update, follow these steps:
1. Visit the following Microsoft Web site:
http://update.microsoft.com/microsoftupdate (http://update.microsoft.com/microsoftupdate)
2. Click Start Now.
3. On the Review the license agreement page, click Continue.
4. Click Install.

Note You may not be prompted to install the Microsoft Update software if this software is already available on the computer.
After you successfully install the software, a Microsoft Update shortcut is added to the All Programs menu on the Start menu.

Back to the top

I am currently using Microsoft Update. How can I access Windows Update?

To stop using the Microsoft Update Web site and start using the Windows Update Web site, follow these steps:
1. On the Microsoft Update site, click Change Settings.
2. Scroll down the page, click to select the Disable Microsoft Update software and let me use Windows Update only check box, and then click Apply changes now.
3. You receive the following message:
Windows Automatic Updates will not be able to deliver updates from Microsoft Update Service.

Are you sure you want to continue?
Click Yes.
For more information about a related topic, click the following article number to view the article in the Microsoft Knowledge Base:
327838 (http://support.microsoft.com/kb/327838/) How to schedule automatic updates in Windows Server 2003, in Windows XP, and in Windows 2000

http://support.microsoft.com/?kbid=901037
Posted by 백냥
2007. 3. 28. 09:28
336x280(권장), 300x250(권장), 250x250, 200x200 크기의 광고 코드만 넣을 수 있습니다.

Novell Netware 는 기본적으로 eDirectory 기반으로 Novell 인증을 사용한다.
부팅시 항상 Novell Netware 로그인을 하라는 메시지가 나타난다.
하지만, 굳이 Novell Netware로 로그인하지 않고 윈도우 인증을 먼저한 후
필요에 따라 Novell Netware 인증을 받을 수 있는 방법이다.

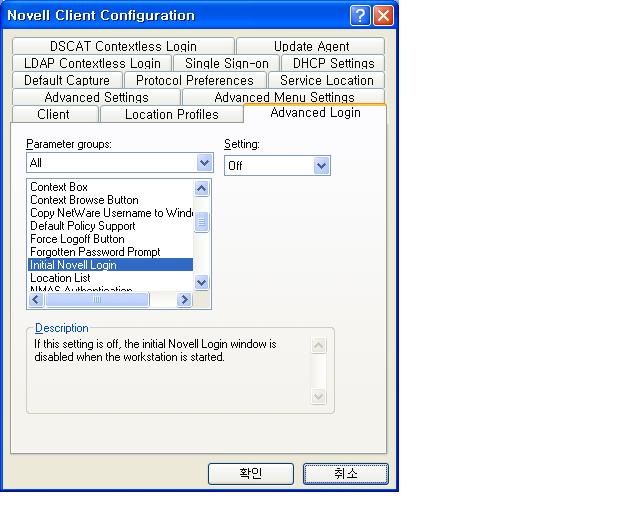
(1) 시스템트레이에 붉은 N 마크에서 오른쪽마우스 버튼
(2) Novell Client Configureation 에서 Advanced Login 탭을 선택한다.
(3) 항목 중 Initial Novell Login 항목을 Off 로 변경한다.
(4) 재부팅 후 윈도우 인증화면을 확인할 수 있다.


사용자 삽입 이미지

윈도우인증하기


Posted by 백냥
2007. 3. 26. 12:56
336x280(권장), 300x250(권장), 250x250, 200x200 크기의 광고 코드만 넣을 수 있습니다.


WebSpere 4.x stop/start

 #>ps -ef | grep java
 #>kill -9 javapid
 #>su - wasuser
 #>cd /Product/WebSphere/AppServer/bin
 #>./startupServer.sh &

WebSphere 5.x stop/start
 #>ps -ef | grep java
 #>kill -9 javapid
 #>cd /Product/WebSphere/DeploymentManager/bin
 #>./startManager.sh
 #>su - wasuser
 #>cd /Product/WebSphere/AppServer/bin
 #>./startNode.sh
 #>./startServer.sh SAFIND
 
WebSphere 6.x 
 #>ps -ef | grep java
 #>kill -9 javapid
 #>cd /Product/was60/AppServer/profiles/Dmgr01/bin
 #>./startManager.sh
 #>cd /Product/was60/AppServer/profiles/AppSrv01/bin
 #>./startNode.sh
 #>./startServer.sh wasappname

 
WebSphere WAS 5.x 및 6.x 를 stop/start
** Stop
        /Product/was60/AppServer/profiles/Dmgr01/bin/
        ./stopManager.sh
        # 보안설정시
        ./stopManager.sh -user [wasadmin] -password [asdf123]

        /Product/was60/AppServer/profiles/AppSrv01/bin
        ./stopNode.sh
        # 보안설정시
        ./stopNode.sh -user [wasadmin] -password [asdf123]

        /Product/was60/AppServer/profiles/AppSrv01/bin
        ./stopServer.sh wasappname
        # 보안설정시
        ./stopServer.sh -user [wasadmin] -password [asdf123]

** Start
        /Product/was60/AppServer/profiles/Dmgr01/bin/
        ./startManager.sh
        # 보안설정시
        ./startManager.sh -user [wasadm6] -password [asdf123]
        # 관리자 시작 로그
        /Product/was60/AppServer/profiles/Dmgr01/logs/dmgr/startServer.log

        /Product/was60/AppServer/profiles/AppSrv01/bin
        ./startNode.sh
        # 보안설정시
        ./startNode.sh -user [wasadm6] -password [asdf123]
        # nodeagent 시작 로그
        /Product/was60/AppServer/profiles/AppSrv01/logs/nodeagent/startServer.log

        /Product/was60/AppServer/profiles/AppSrv01/bin
        ./startServer.sh [wasappname]
        # 보안설정시
        ./startServer.sh [wasappname] -user [wasadm6] -password [asdf123]
        # WAS시작시 trace 하기
        ./startServer.sh [wasappname] -trace -user [wasadm6] -password [asdf123]

# javakill(웹스피어 모든 java kill) 잘안되면 한방에 끝.
        /Product/was60/AppServer/profiles/AppSrv01/bin
        ./javakill.sh

# Application Server 설치상태 확인
/Product/was60/AppServer/profiles/AppSrv01/bin/serverStatus.sh -all

'WAS' 카테고리의 다른 글

apache 로그 날짜별로 저장  (2) 2007.10.15
WAS에서 이미지처리 하도록 설정  (0) 2007.08.02
http 오류코드  (0) 2007.08.01
Posted by 백냥